Smart Bank Import: Step-by-Step Guide
This guide explains how to connect your bank to Dolibarr using Smart Bank Import to automate your Dolibarr accounting.
1
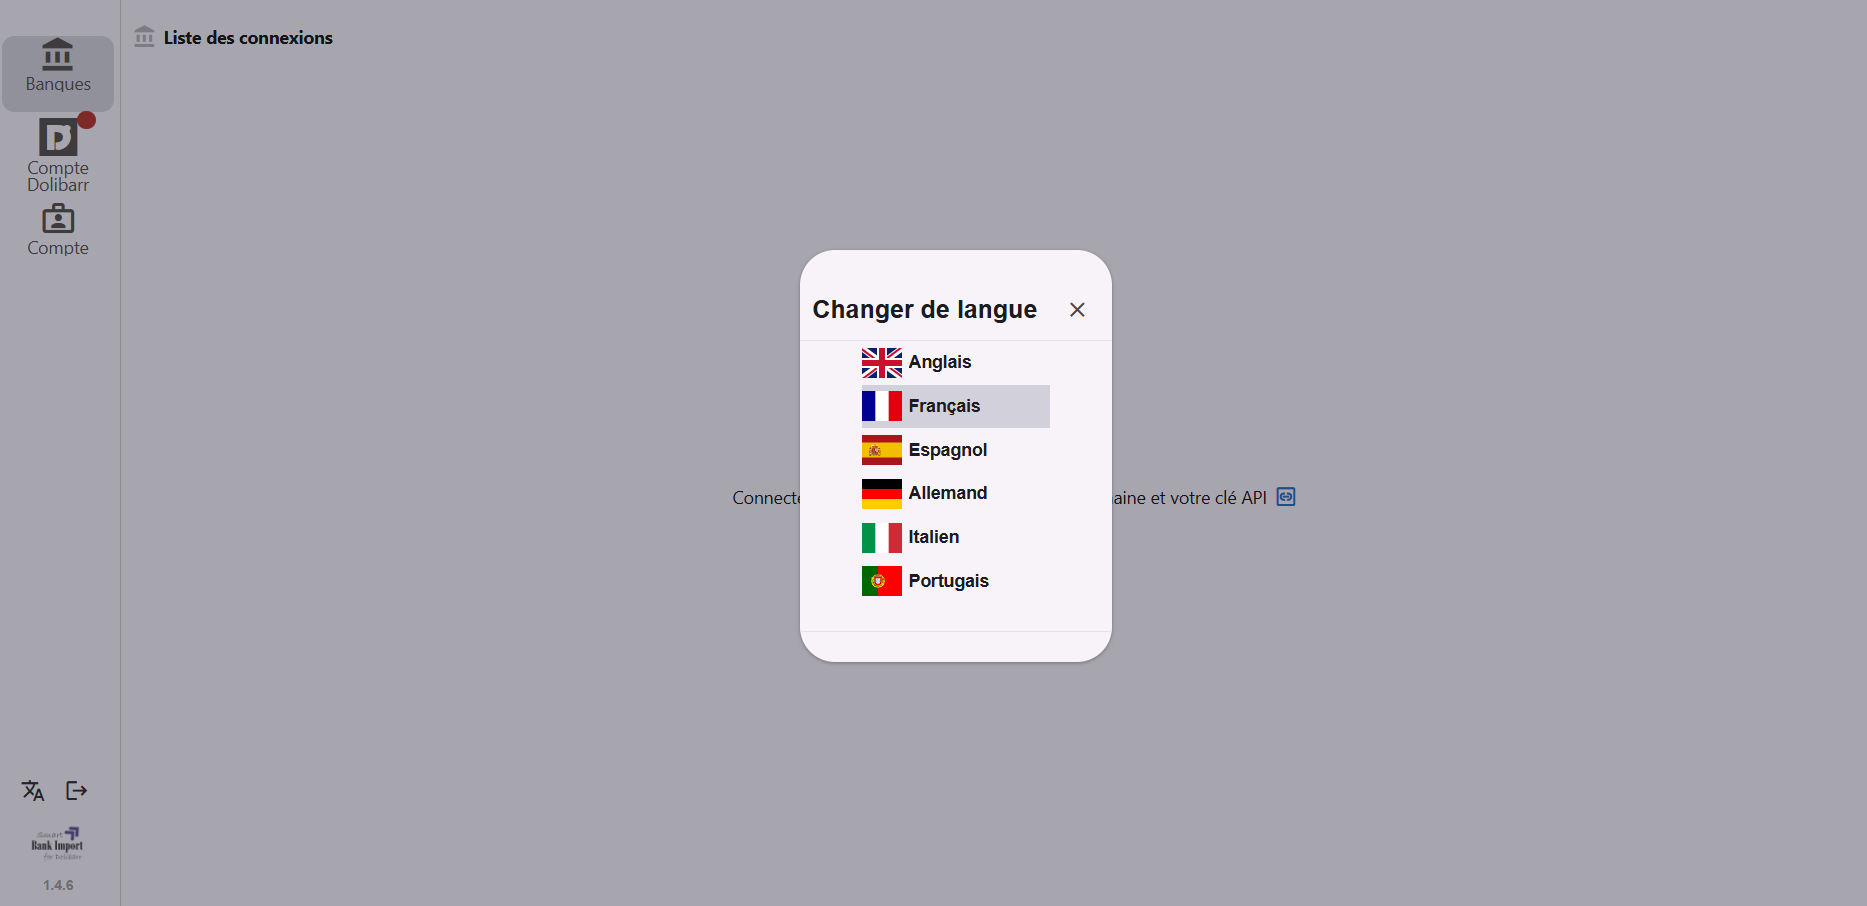
Select the Language for the App
The very first step is to make sure you are using Smart Bank Import in the language you are most comfortable with.
2
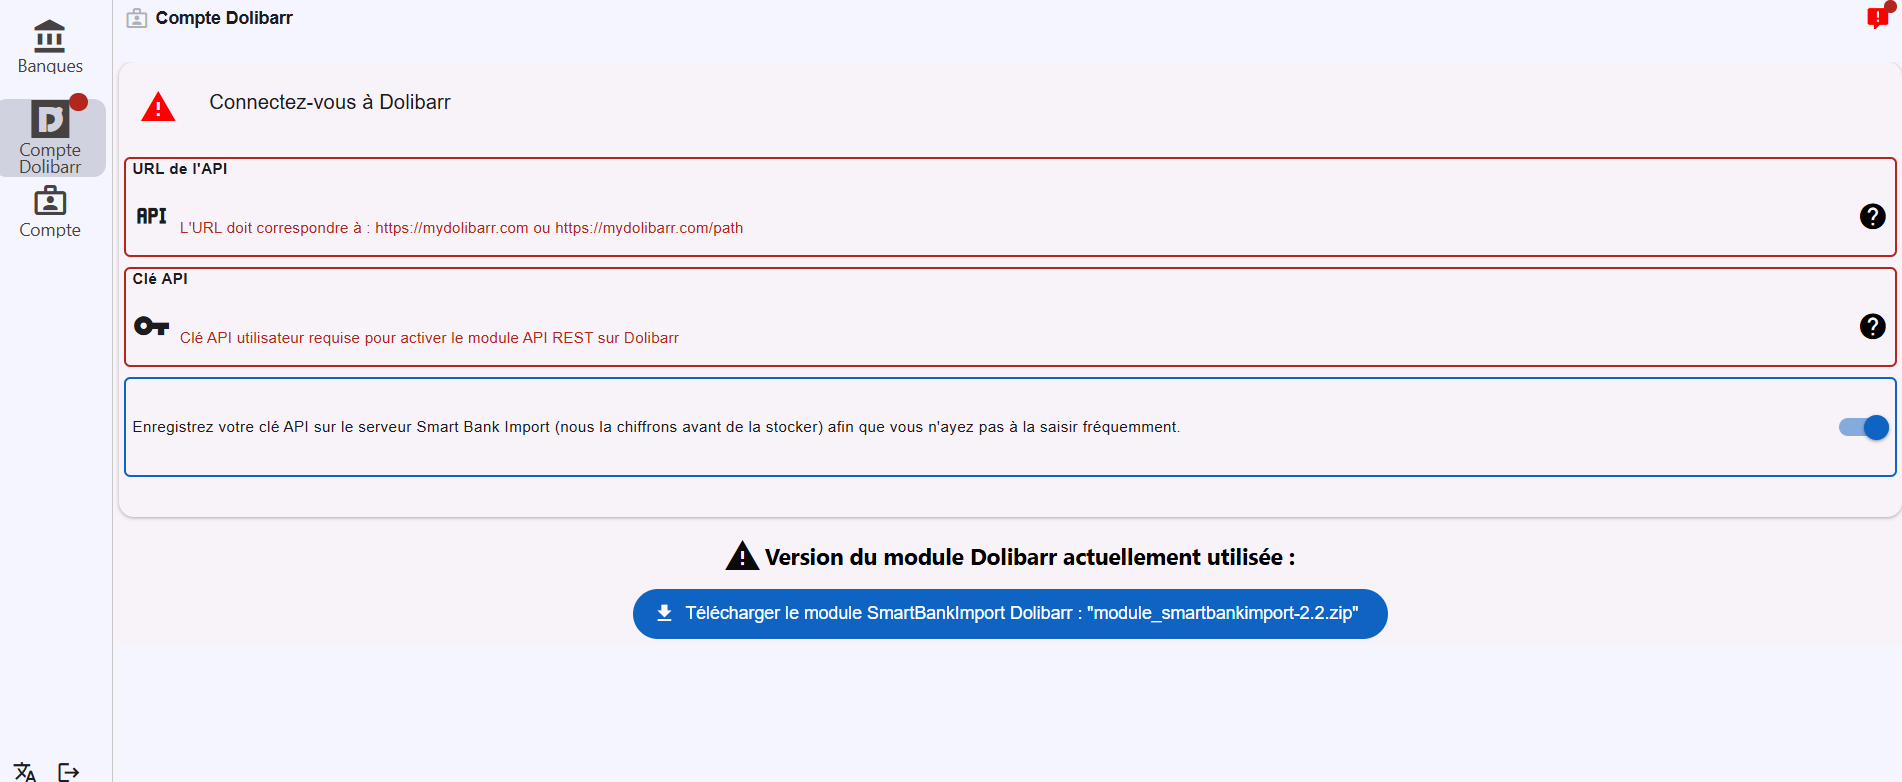
Connect Your Dolibarr Account
This will allow Smart Bank Import to create elements (invoices, payments, salaries…) from your bank transactions.
- Click the Dolibarr icon in the left menu, located just below the bank icon.
- Enter your Dolibarr information
You will need to provide the following:
- API URL: it should follow the format https://yourdolibarr.com
- API Key:
Go to Dolibarr → Settings → User Card and copy the API key.
If you do not see it, make sure the REST API module is enabled and you have the necessary permissions.
- Paste and Confirm
Paste your API key into Smart Bank Import and click “Confirm.”
✅ Your Dolibarr account is now successfully linked!
You will need to provide the following:
- API URL: it should follow the format https://yourdolibarr.com
- API Key:
Go to Dolibarr → Settings → User Card and copy the API key.
If you do not see it, make sure the REST API module is enabled and you have the necessary permissions.
Paste your API key into Smart Bank Import and click “Confirm.”
Smart Bank Import is designed specifically for Dolibarr ERP & CRM users who want error-free automated reconciliation.
Getting an error after entering your Dolibarr URL and API key?
Before contacting support, please test your API using the Dolibarr REST API Explorer. Enter your API key and verify that the API returns data correctly. If the API Explorer returns an error, the issue is likely related to your Dolibarr API configuration rather than Smart Bank Import.
For Qonto Users: Qonto users have an additional benefit — you can directly import and transfer documents from Qonto into Smart Bank Import. Just add your Qonto API key and ID into Dolibarr.
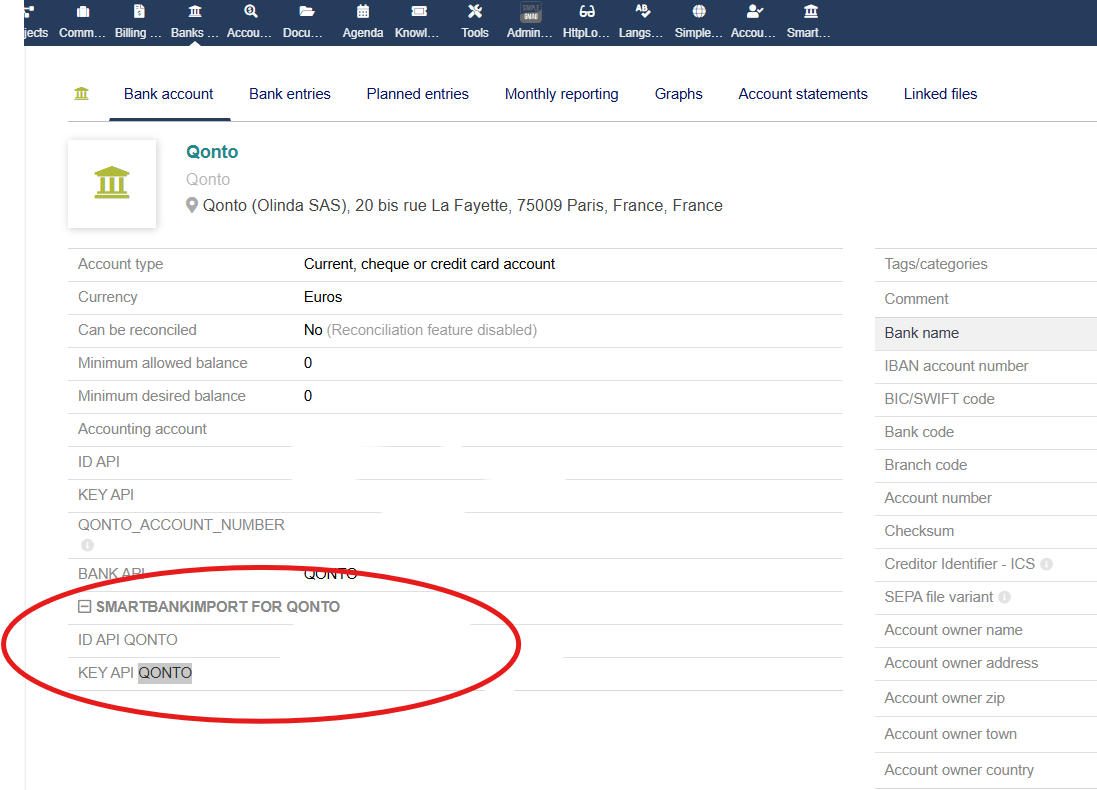
The ID API QONTO and KEY API QONTO fields need to be filled in under the SmartBankImport for Qonto section of your Dolibarr.
You can obtain this information directly from your Qonto account by following these steps:
You can obtain this information directly from your Qonto account by following these steps:
- Log in to your Qonto account.
- In the left-hand menu, click on “Settings"
- Then select “API Integration"
- Copy your API ID and API Key
3
Download Smart Bank Import Dolibarr module and install as an external module
External modules are modules you can get on other sources than official sources. They are provided by third parties. Most of them can be found in the marketplace https://www.dolistore.com. List of external modules is defined on the page Complementary modules.
4
Connect Your Bank
1. ENABLE BANKING
To ensure data confidentiality and full control over your information, we strongly recommend connecting your bank via Enable Banking. You create your own account and application, and your data remains entirely under your control. Follow the guide below to connect your bank to Smart Bank Import using Enable Banking.
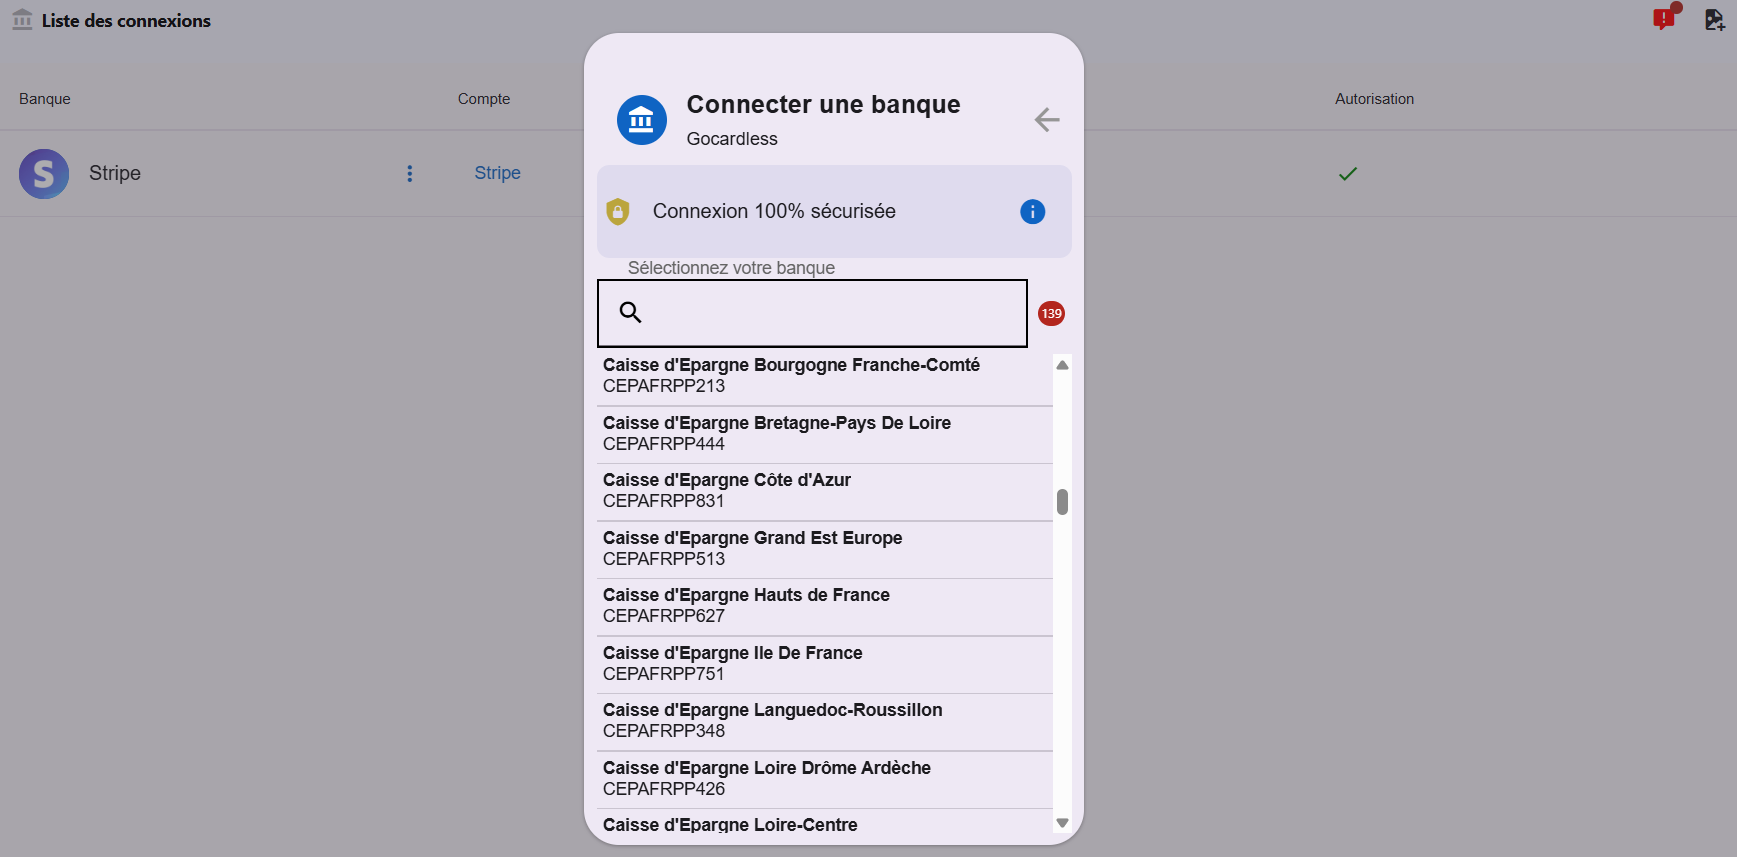
2. Another Fast and Secure way of connecting your bank to Smart Bank Import is through GoCardless. Follow these steps carefully to connect through GoCardless:
- Choose your country: Select the country where your bank account is registered so the application can display the banks that suit you.
- Select your bank: In the list provided, click on the name of your bank. If you do not find it, use the search bar.
- Authorization: You will be redirected to a secure GoCardless page where you can log in to your online bank. Your data is encrypted and secure.
- Confirmation: Once your request is approved, your bank will be connected and the transactions will start to synchronize automatically in the application
3: Security & Data Protection
In Smart Bank Import, transactions are not stored on our servers. They are saved directly in your Dolibarr database. Our servers only host the application interface (front-end); no banking data is stored.
In Smart Bank Import, transactions are not stored on our servers. They are saved directly in your Dolibarr database. Our servers only host the application interface (front-end); no banking data is stored.
Security & Roles
User Roles & Access Rights
Each Smart Bank Import account can have two users:
Each Smart Bank Import account can have two users:
- Administrator – full access to settings, users, transactions, and document management.
- User – limited access to transactions and documents, according to the permissions defined by the Administrator.
5
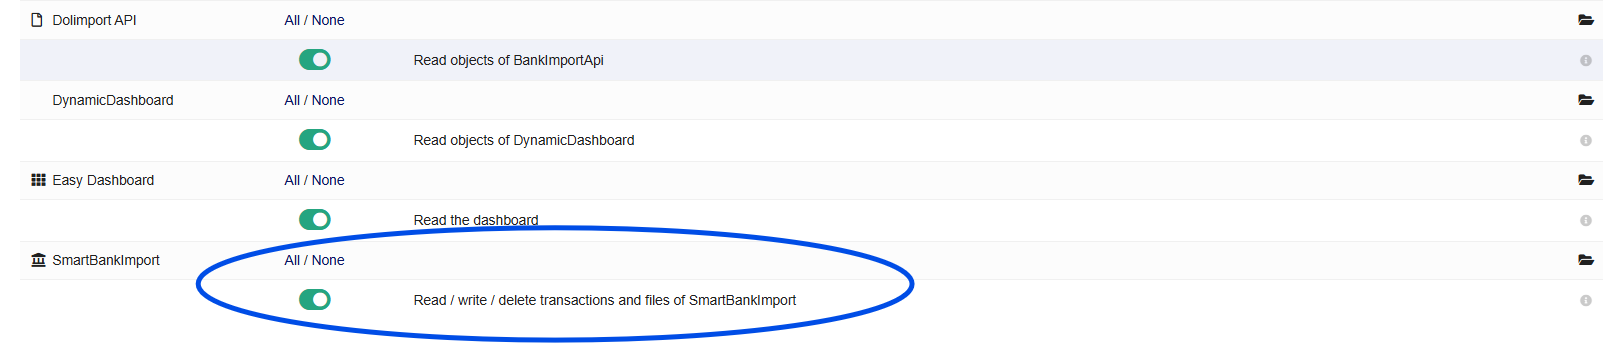
Set write permissions for the Smart Bank Import module
Go to your User profile, then open the Permissions section.
Make sure the option “Read / write / delete transactions and files of Smart Bank Import” is enabled (checked ON).
6
Using Smart Bank Import
To ensure Smart Bank Import works properly, please verify that your Dolibarr configuration is set to production mode: $dolibarr_main_prod = "1" in your conf.php file.
Once everything is connected, you can start using Smart Bank Import for your daily financial operations. Here’s an overview of the available features:
7
Features:
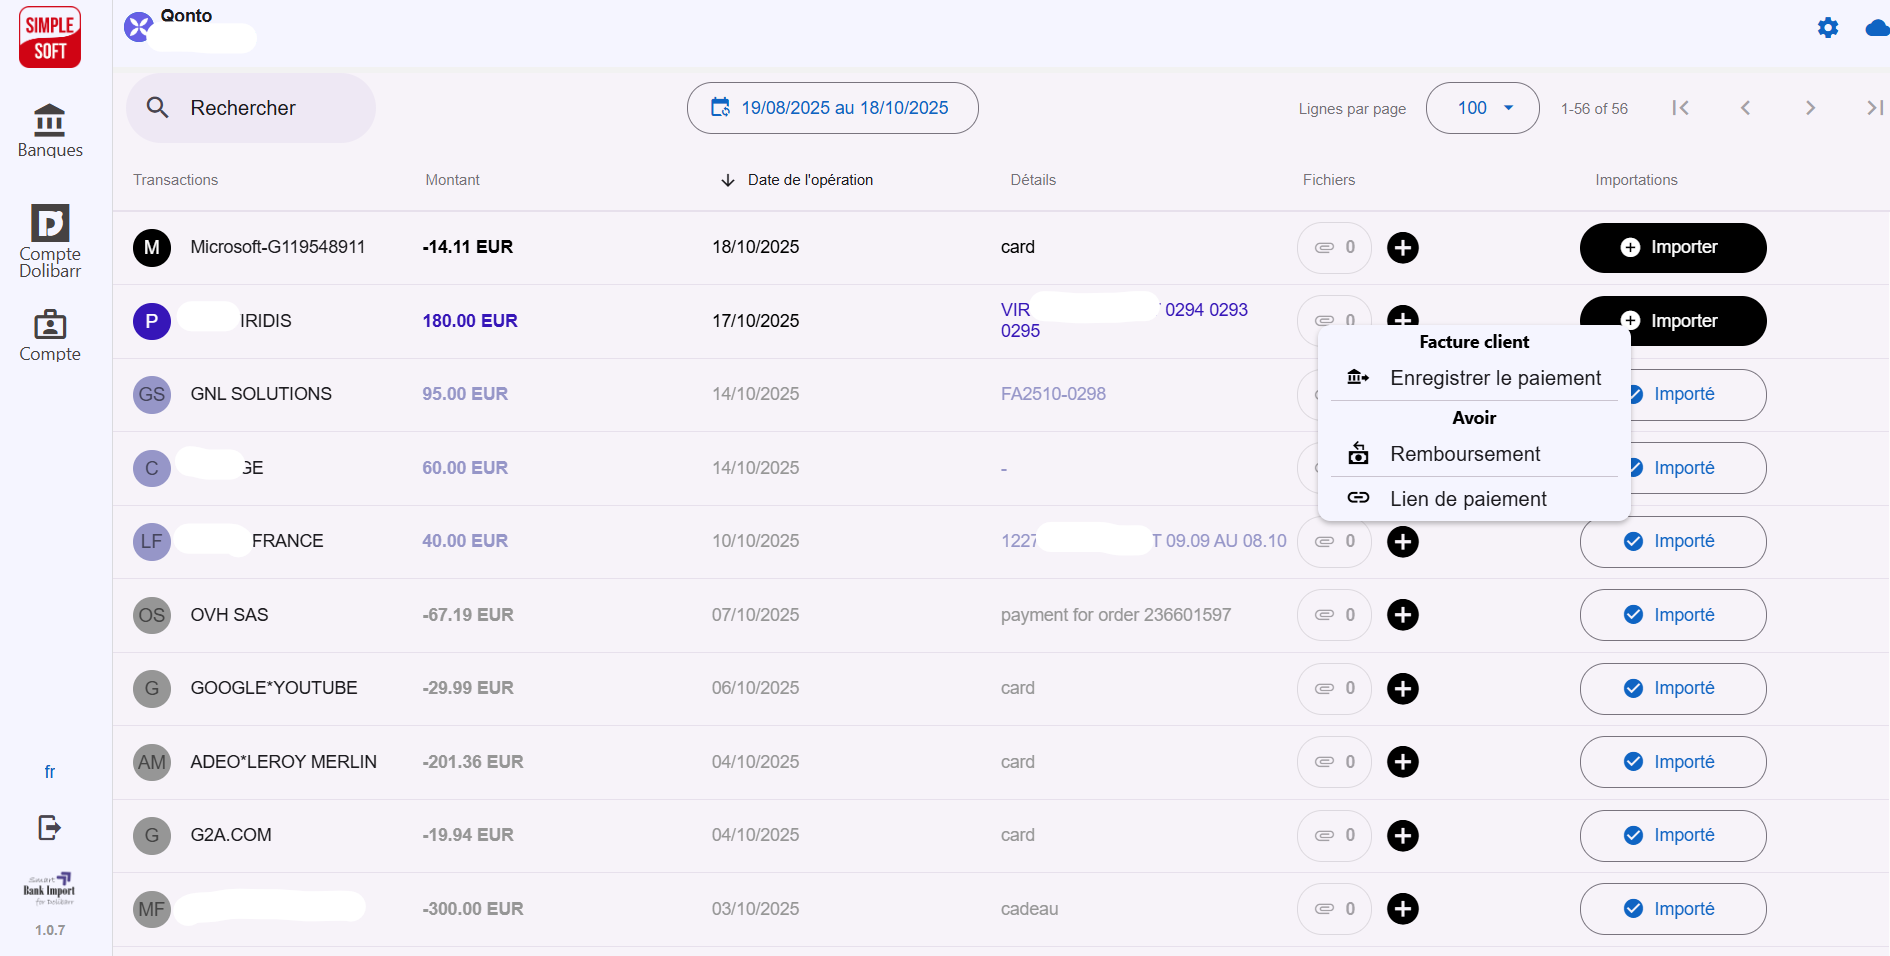
Credit Management (Incoming Payment)
- Upload Documents
- Register Payment
- Create Credit Notes
- Link Credit with Dolibarr Payments
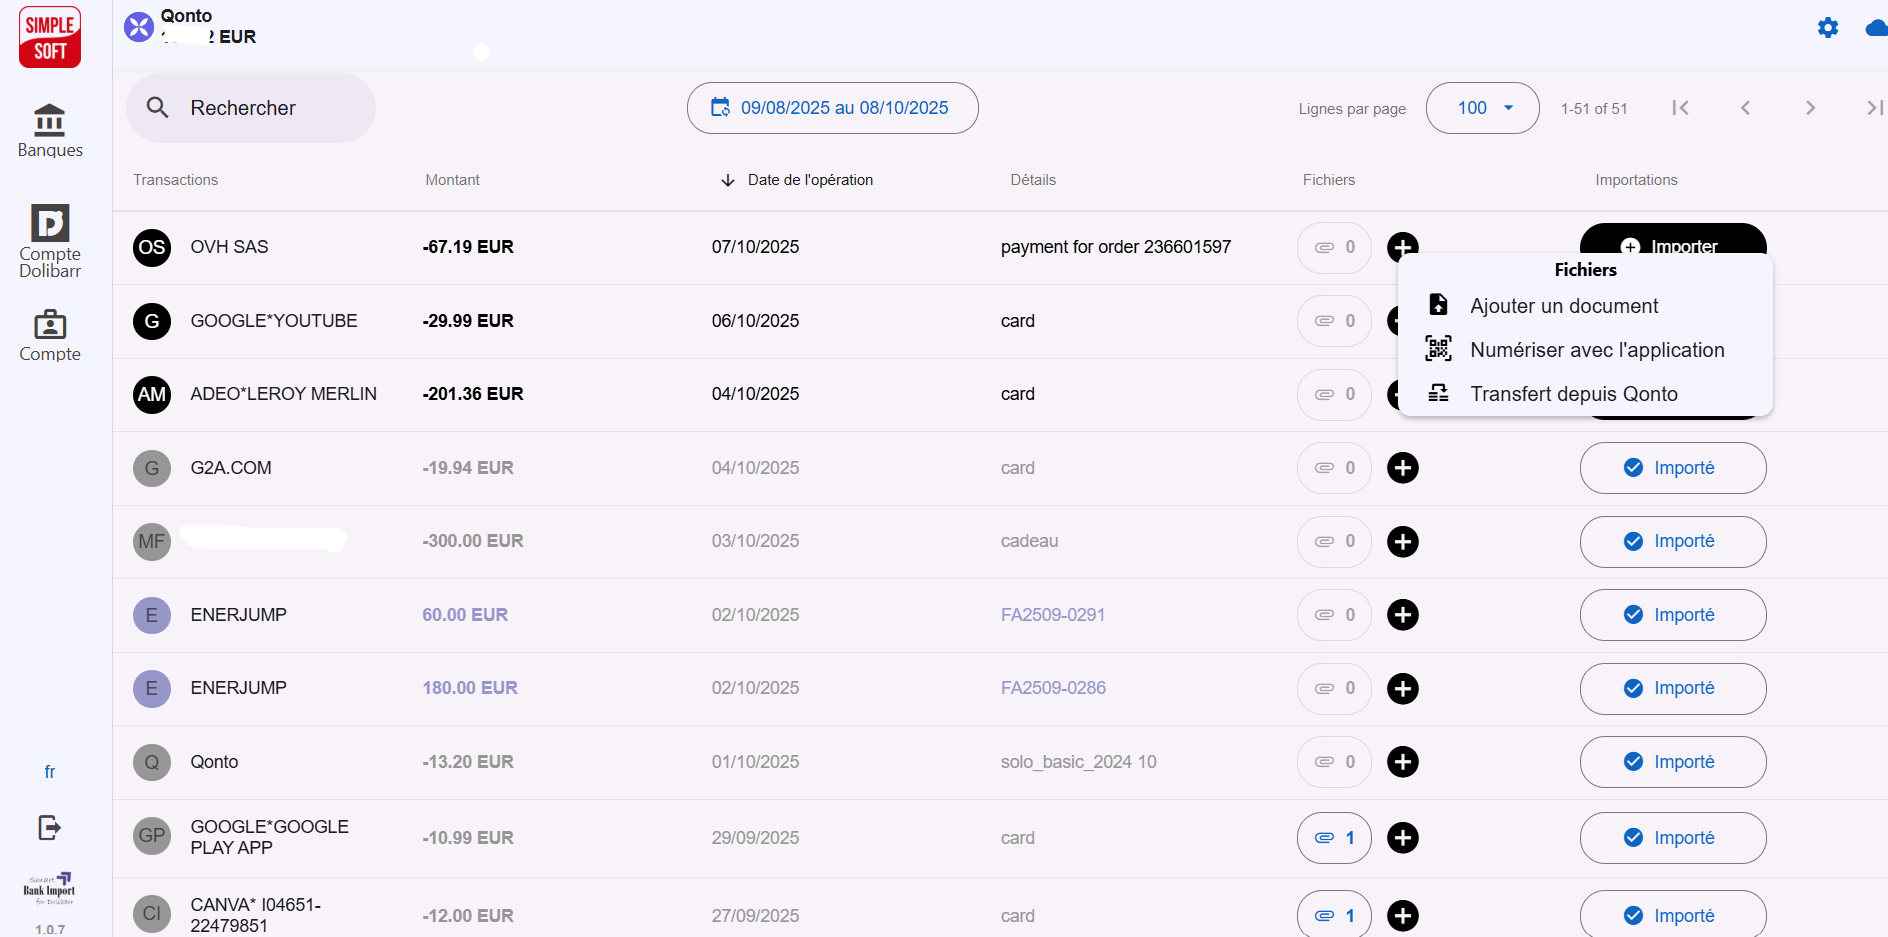
Document Library
Document Library
Smart Bank Import now allows you to upload and store documents (invoices, receipts, tickets) in your Document Library for later use.
From your Android phone:
- Scan documents directly into the library
- Access them anytime for linking to transactions, invoices, or expenses
Smart Bank Import now allows you to upload and store documents (invoices, receipts, tickets) in your Document Library for later use.
From your Android phone:
- Scan documents directly into the library
- Access them anytime for linking to transactions, invoices, or expenses
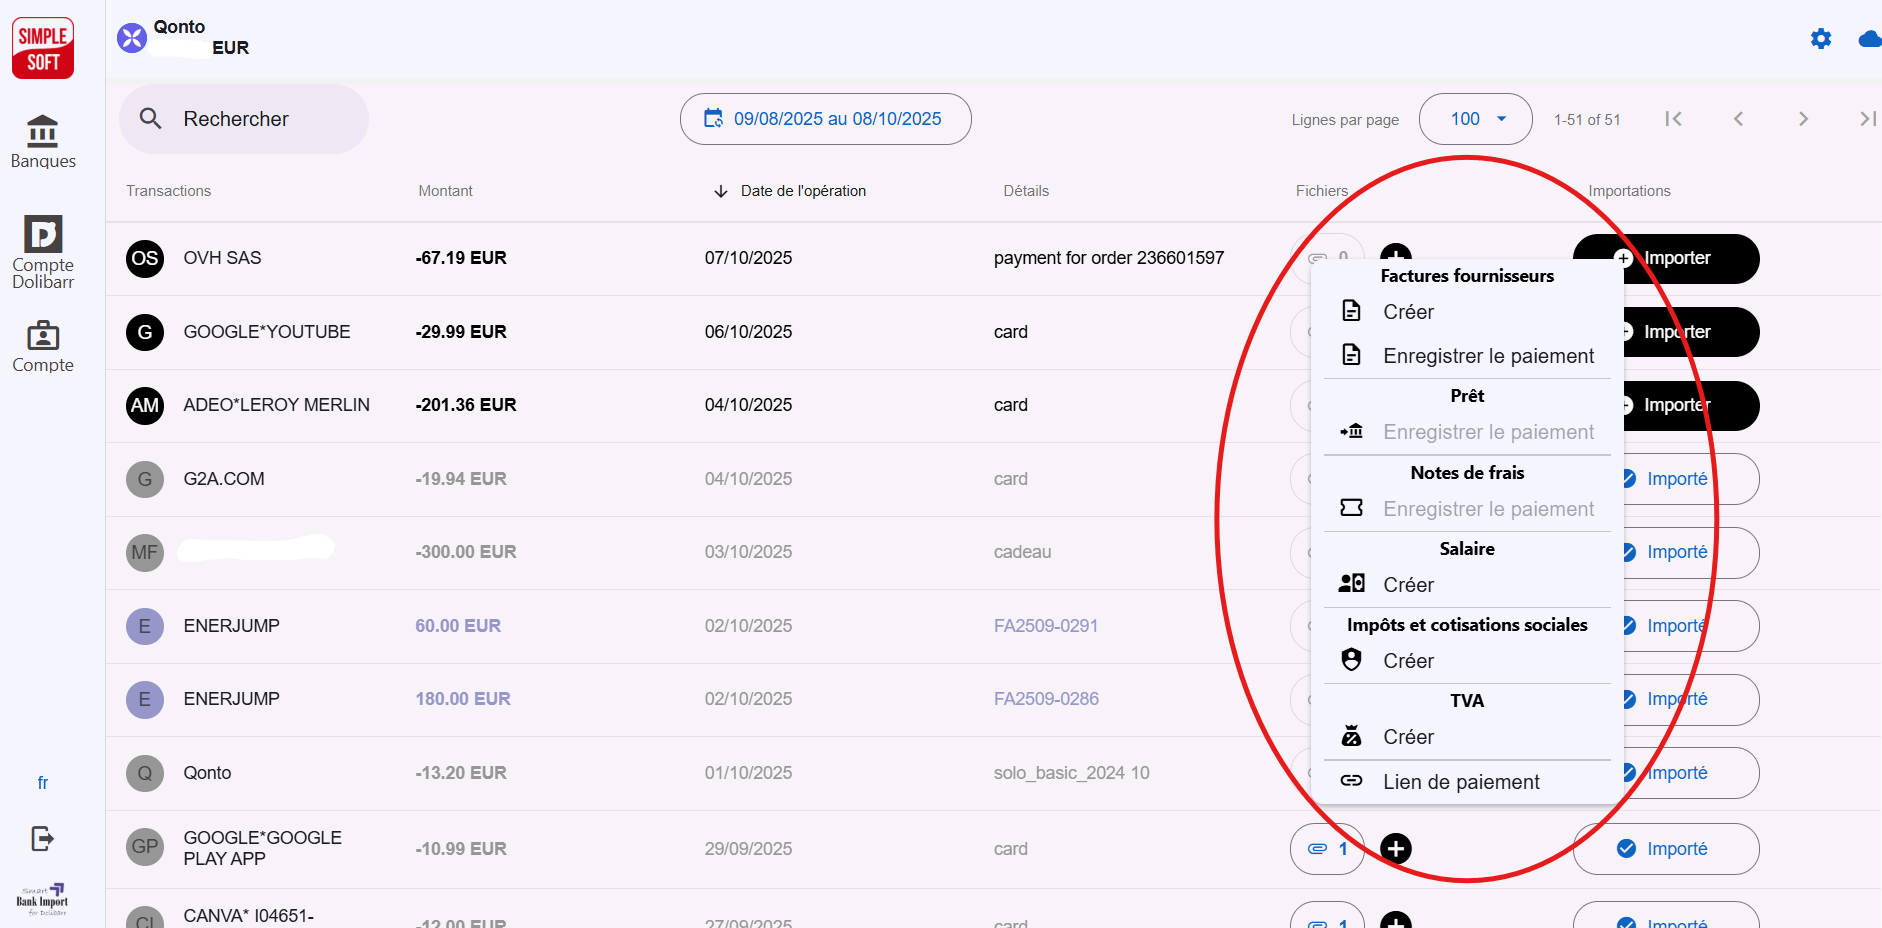
Managing Debits (Outgoing Money)
- Upload or Scan receipts or proof of payments
- Create Vendor Invoices
- Pay Invoices
- Register Expense Report (Payments)
- Create Salaries
- Pay Taxes/VAT
- Link Debits with Dolibarr Payments
Bank Reconciliation with Smart Linking
Smart Linking allows you to automatically reconcile your Dolibarr bank entries with your Smart Bank Import transactions in just one click.
How it works:
- Searches Dolibarr bank entries with the same amounts and dates as Smart Bank Import transactions
- Automatically links matching transactions
- Marks them as reconciled
See Smart Linking in action:
Discover how to reconcile 10 transactions in less than 10 seconds with Smart Bank Import: Smart Linking on Youtube
8
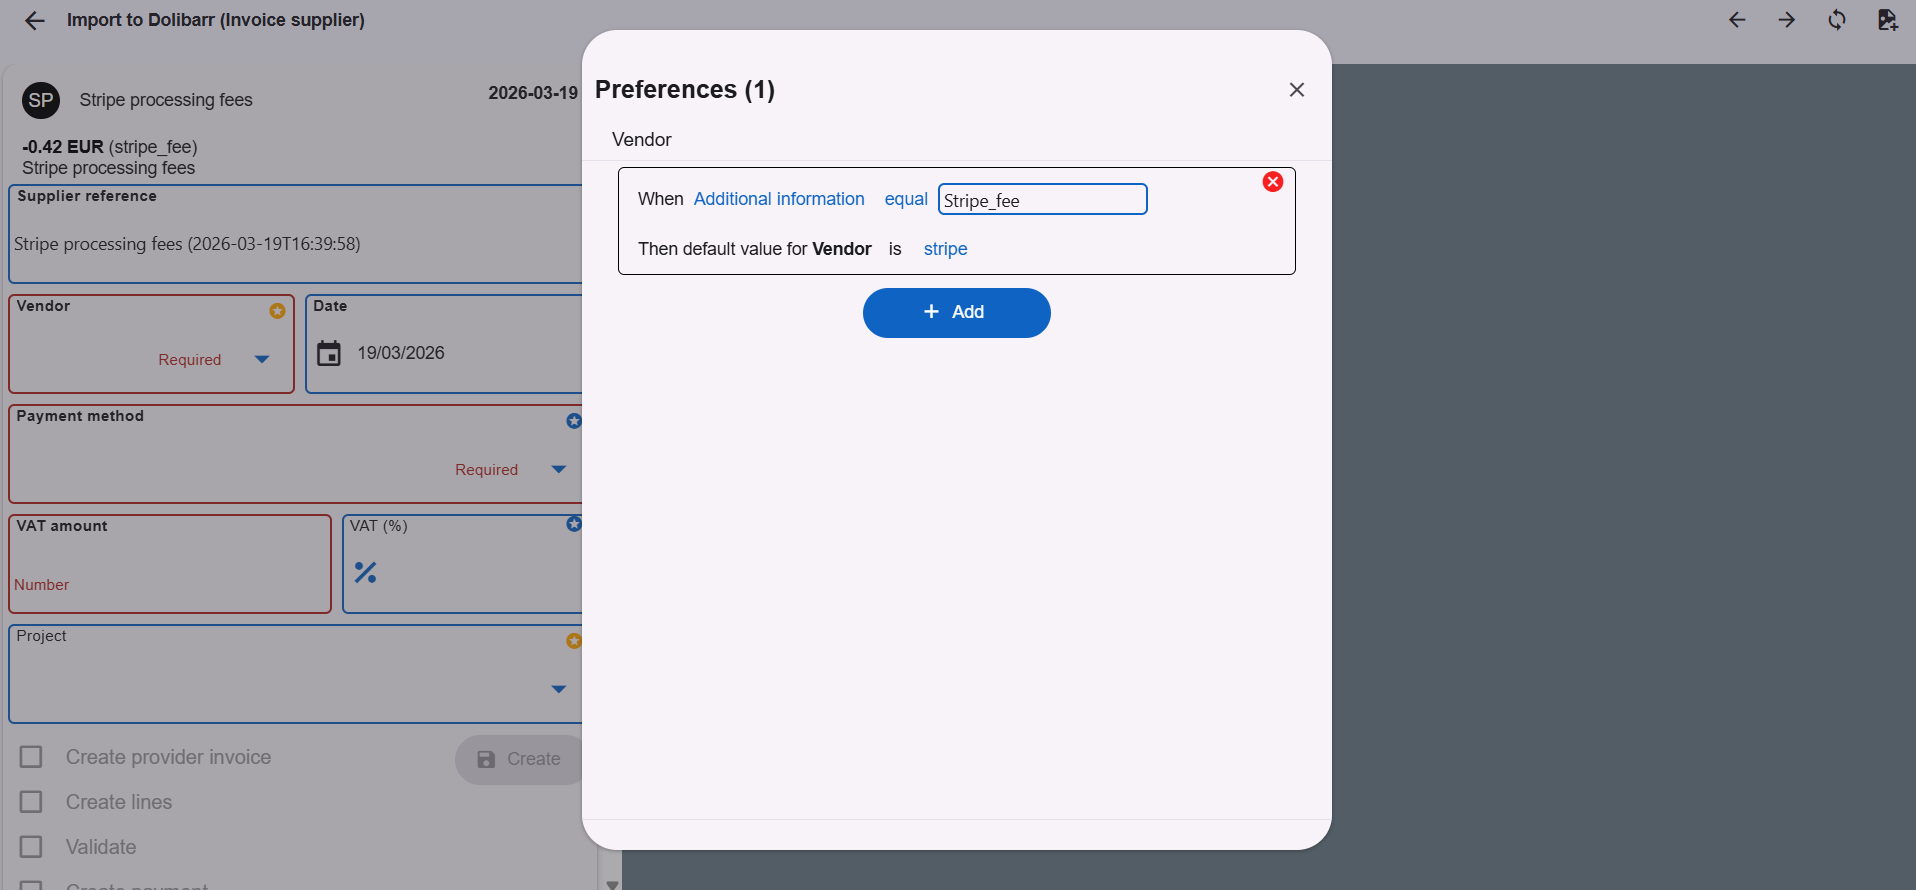
Automation (Default Value Rules)
Smart Bank Import includes an automation feature represented by a star icon, which allows you to define default values based on transaction labels. This functionality helps simplify your workflow by automatically applying predefined values. As a result, you don’t need to manually re-enter the same information each time. For example, you can automatically assign values for recurring elements such as:
Smart Bank Import includes an automation feature represented by a star icon, which allows you to define default values based on transaction labels. This functionality helps simplify your workflow by automatically applying predefined values. As a result, you don’t need to manually re-enter the same information each time. For example, you can automatically assign values for recurring elements such as:
- Supplier invoices
- Salaries
- Taxes
- Other recurring transactions

9
You can test all these features with a 15-day free trial before choosing a plan.
Need Help?
We have tried to explain the workings of Smart Bank Import in detail. If you have further questions or encounter any issues, please write to us at contact@simple-soft.eu. Our team will respond within 48 working hours.
The 15-day free trial includes up to 2 email support requests related to initial setup. Additional technical support, troubleshooting and feature requests are available only to paid users.